SoftNote ePoS App — User Guide
For customers and SoftNote Wallet users:
- Payments are instant and free of charge.
For merchants:
- We charge a 1% withdrawal fee, which is below the market average.
Setting Up
You can operate as a company owner or as a cashier
PoS Features: Role Selection
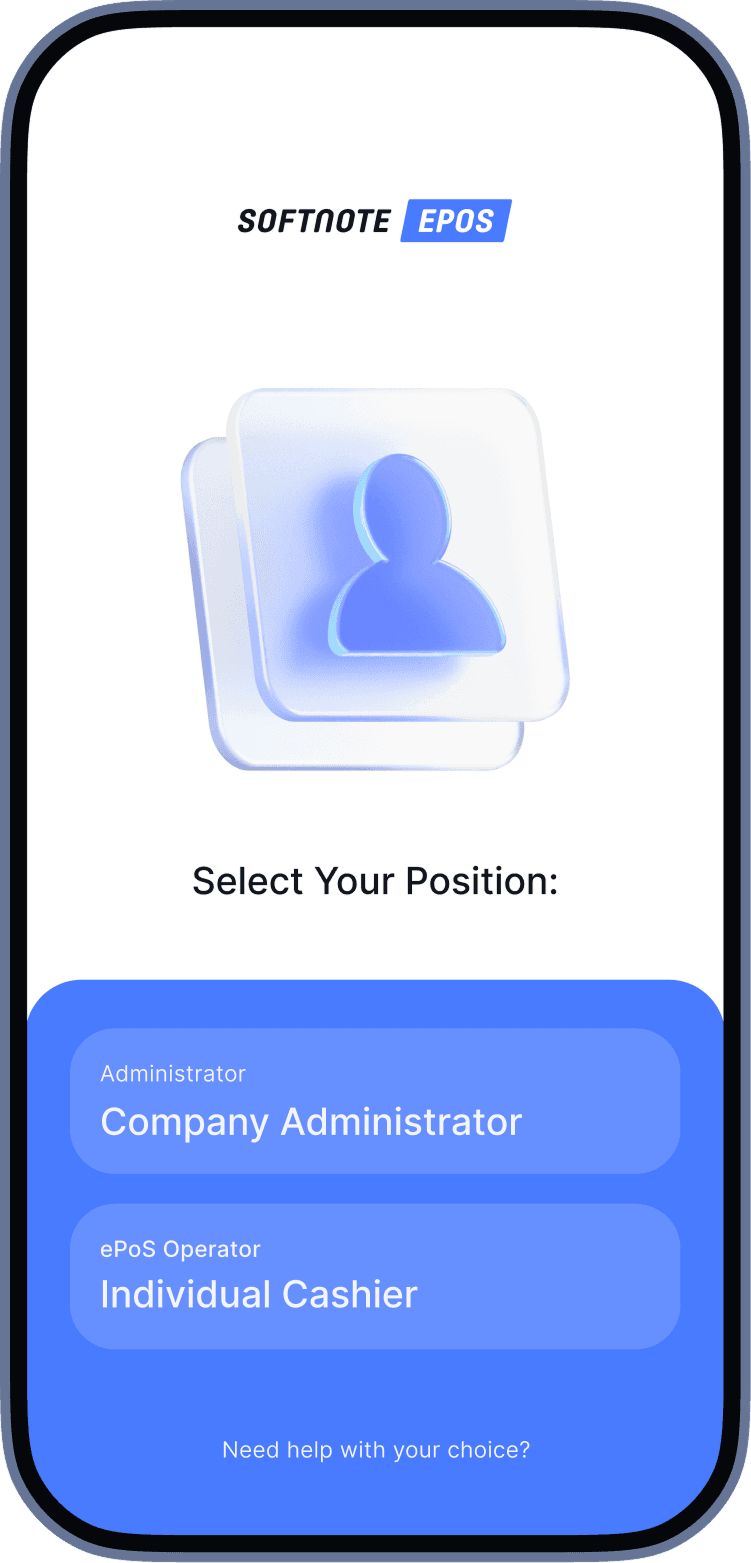
Logging in as a Company Owner
 When you launch the app for the first time, select the option to log in as “Company Administrator”.
 Enter your credentials.
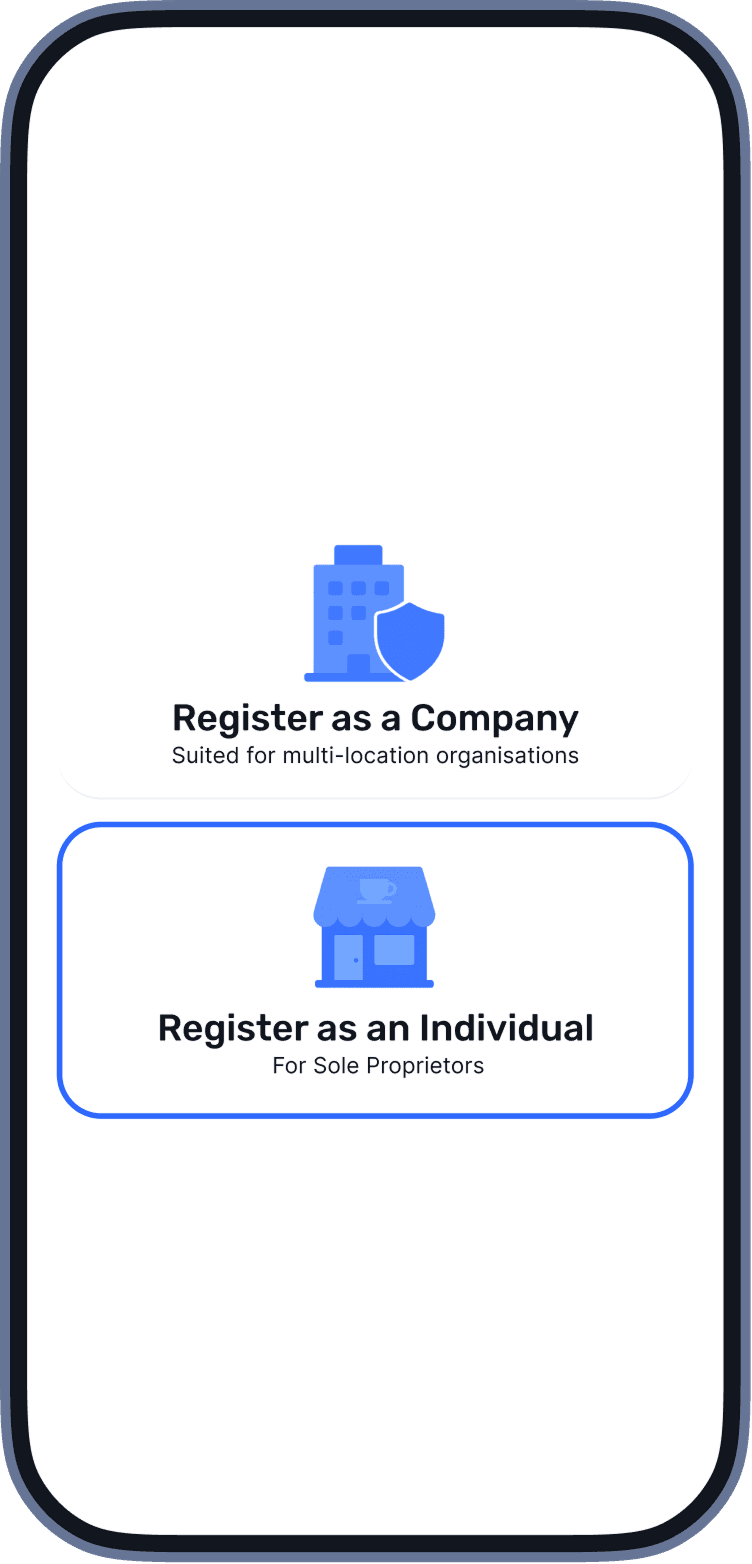
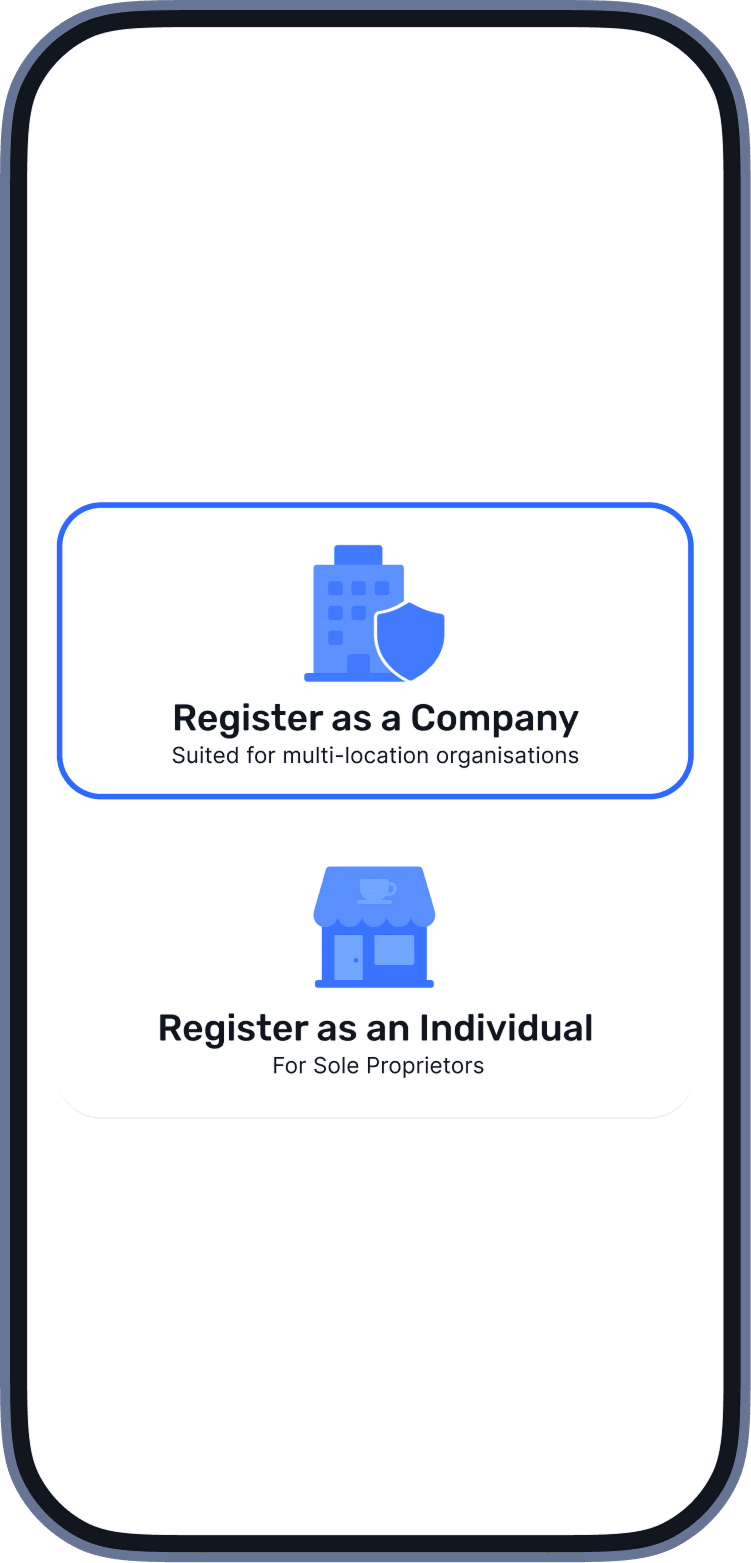 Select your business type: “Register as a Company” or “Register as an Individual”.
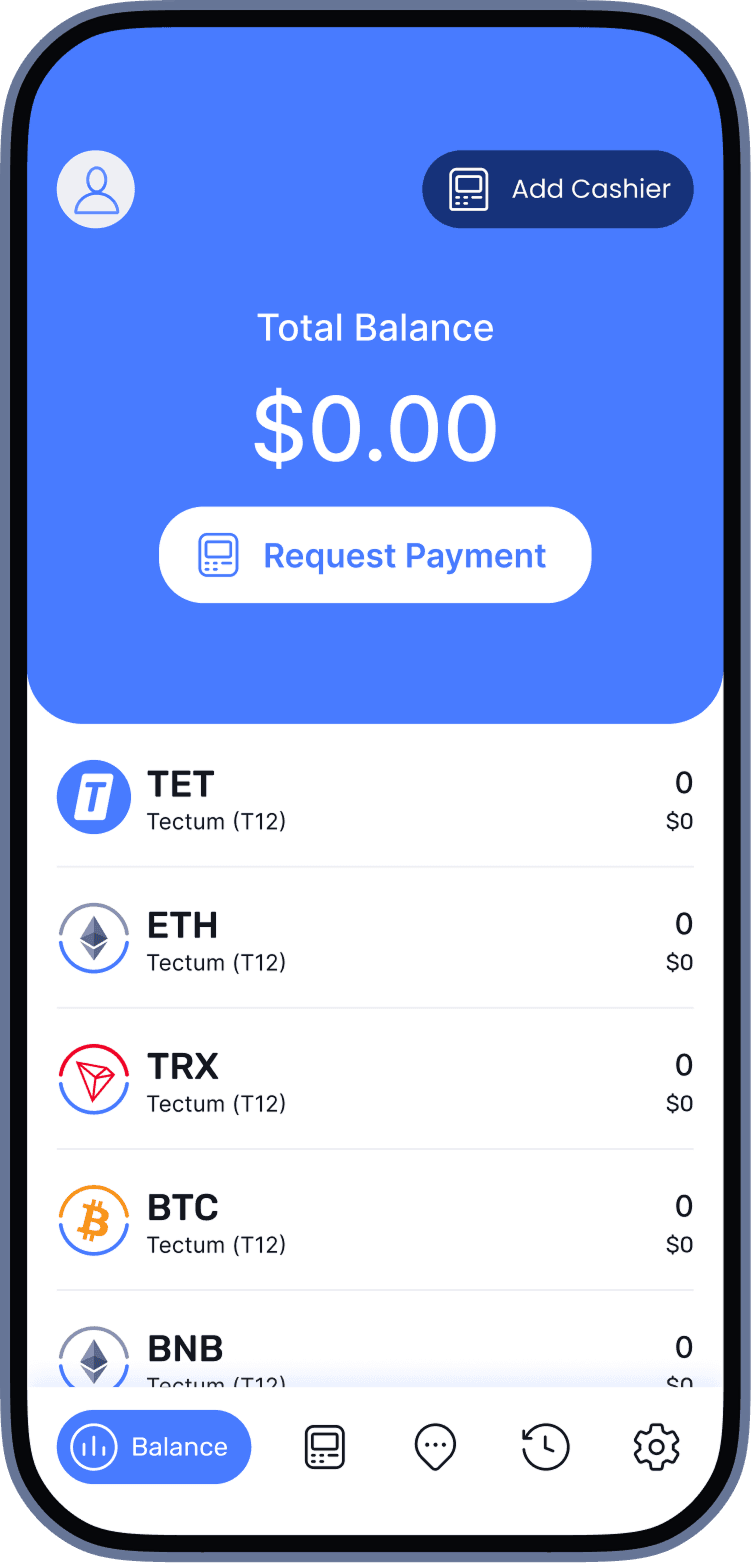 After confirming, you’ll be taken to the company dashboard.
Company Dashboard
The main dashboard allows you to manage your business.
Here you can:
- View your total balance.
- Withdraw funds to your SoftNote account or an external crypto wallet.
- Request payments directly from customers.
- Manage cashiers and locations.
- View sales history and statistics.
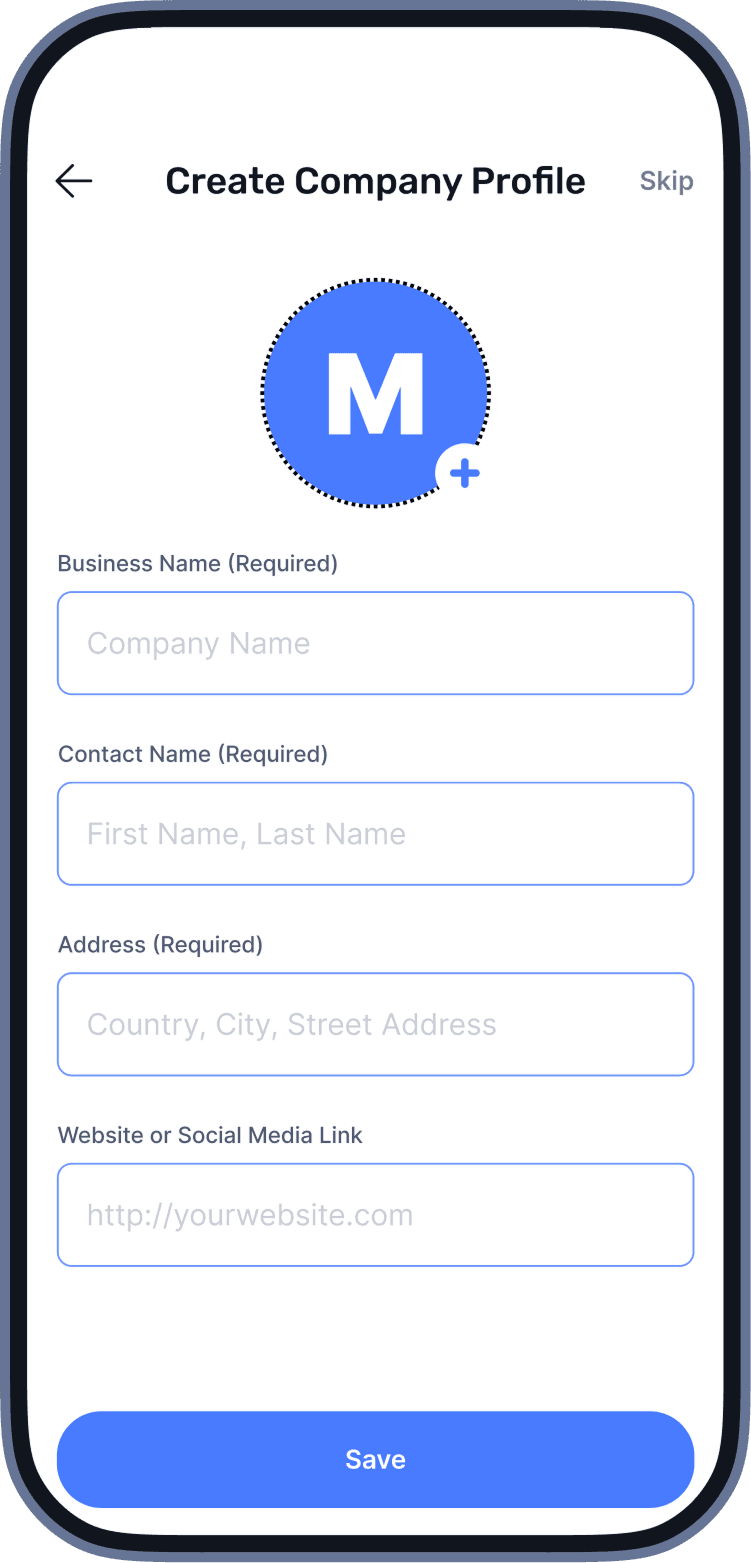
Register as a Company
To register as a company, you need to create a company profile. Fill in the required fields to continue.
You can skip this step and edit your details later in Settings → Edit Profile.
Managing Locations
You can later adjust your locations as needed.
 Open “Locations”. To create a new location, click “Add Location”.
 Enter the name and any relevant details, then save. You can later edit or delete locations as needed. You can later edit or delete locations as needed.
Each cashier can be assigned to one location for easier tracking.
As an Individual, you won’t have access to creating or selecting locations.
Creating a Cashier
 Go to “Cashiers” in the main menu and click “Add Cashier”.
 Fill in the following fields:
Name, Position, PoS Default Сurrency, Location.
Click “Create Cashier”.
 The system will display login details for the new cashier.
Register as an Individual
Payments
There are two ways to accept a payment: as the company owner or as a cashier
Accepting Payments
Creating a Transaction
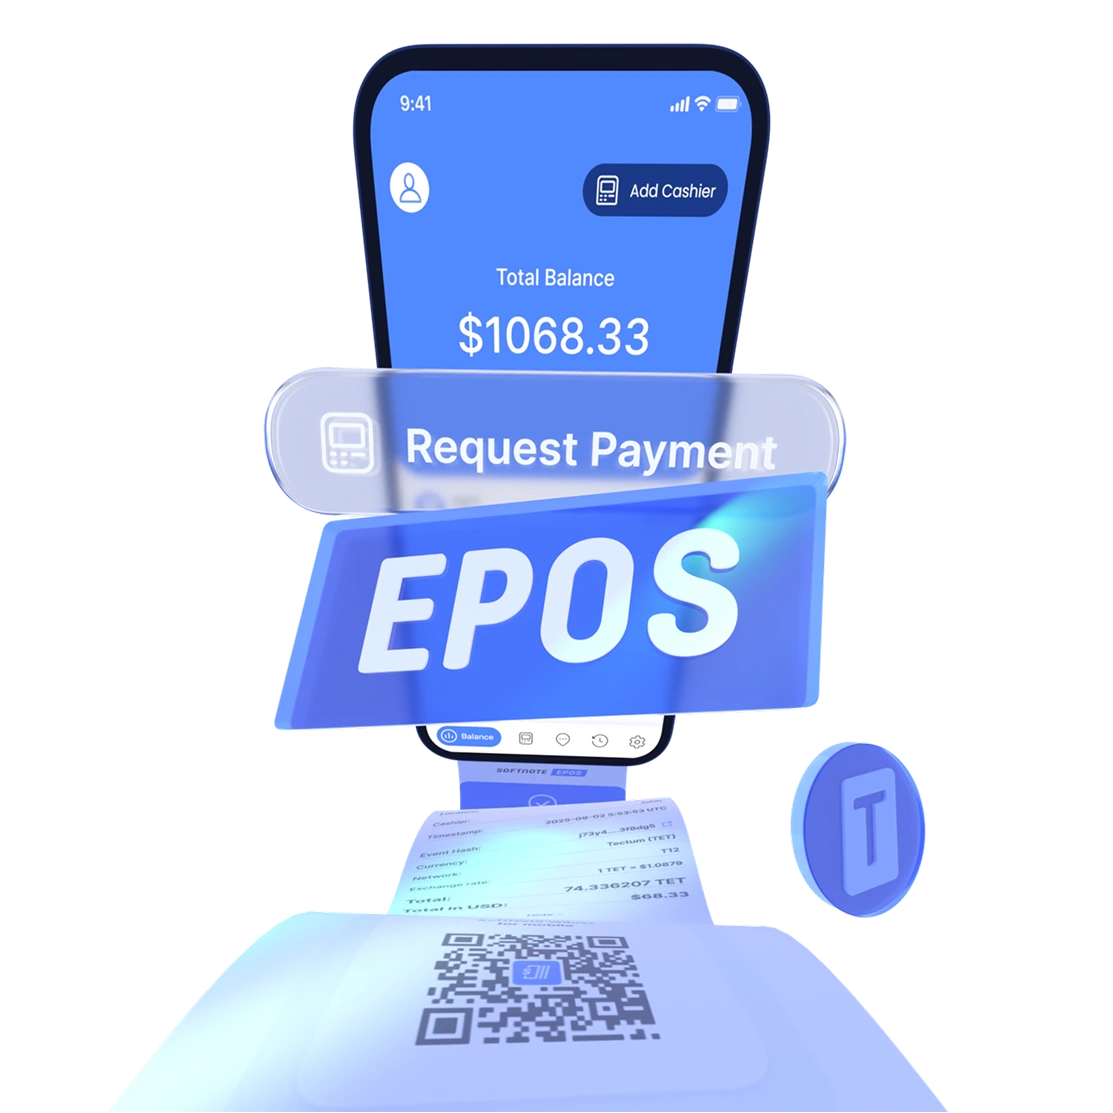
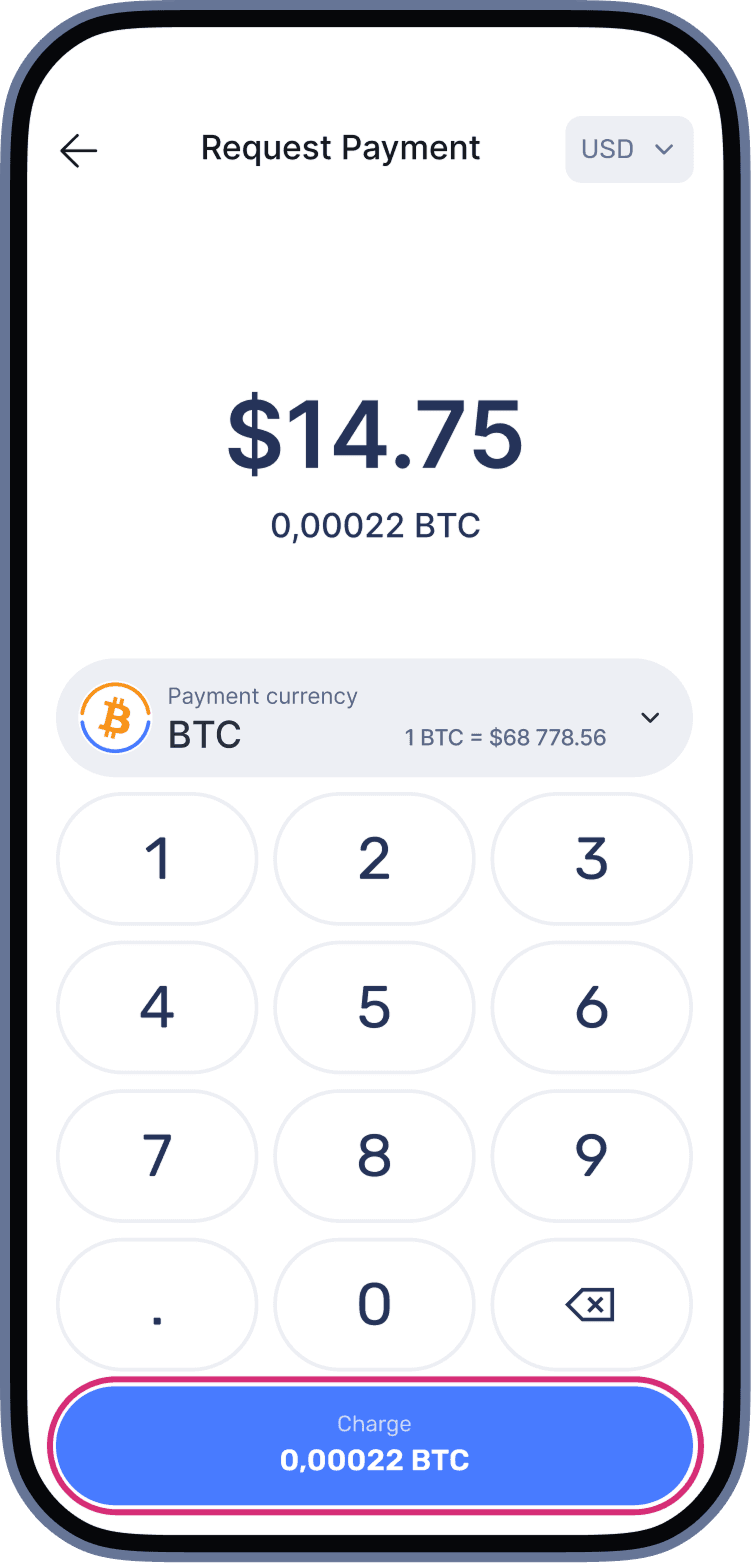
 On the main screen, select “Request Payment”.
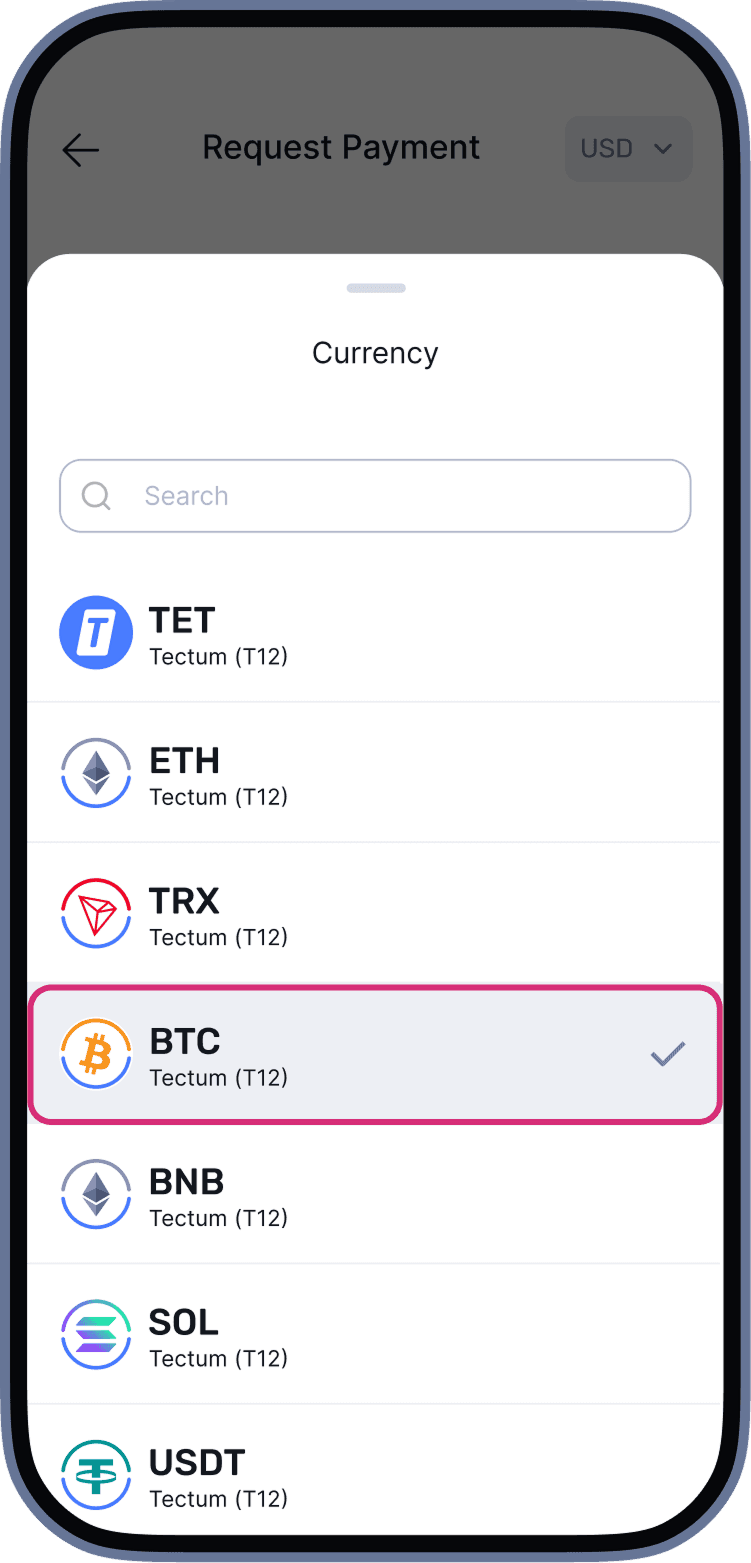
 Enter the payment amount and select the currency*.
 The system will generate a QR-code for the transaction. Show the QR-code to the customer.
 When the transaction is approved, a “success screen” with a QR-code for the receipt will appear.
*Currency Selection for Transaction
Payments are available in all supported currencies on the T12 network.
When creating an invoice, the cashier selects the currency in which you would like to pay. You can then complete the payment using the chosen currency.
Working as a Cashier
 To become a cashier, you must receive a login and password from a company owner.
 Enter the login and password provided by your company owner (merchant). The system will automatically assign your sales location if one is available.
Cashiers cannot view company balances, withdraw funds, or edit other users.
If a company owner temporarily logs in as a cashier, the cashier account will be logged out until the owner completes their session.
Processing
Payments
BLE Payments
 When the cashier requests a transaction, open the SoftNote Wallet app and tap the "Pay" button in the top-right corner.
 Your device will automatically connect to the terminal via Bluetooth, and you will only need to confirm the payment.
 The transaction is finalized once the customer confirms the payment.
QR-Сode Payments
 The customer scans the QR-code using: the SoftNote app (recommended) or the phone camera.
 A confirmation screen will appear on the user’s device.The customer confirms and completes the transaction.
Managing Account
View your transaction history, manage revenue, and withdraw funds
Transaction History and Revenue Distributions
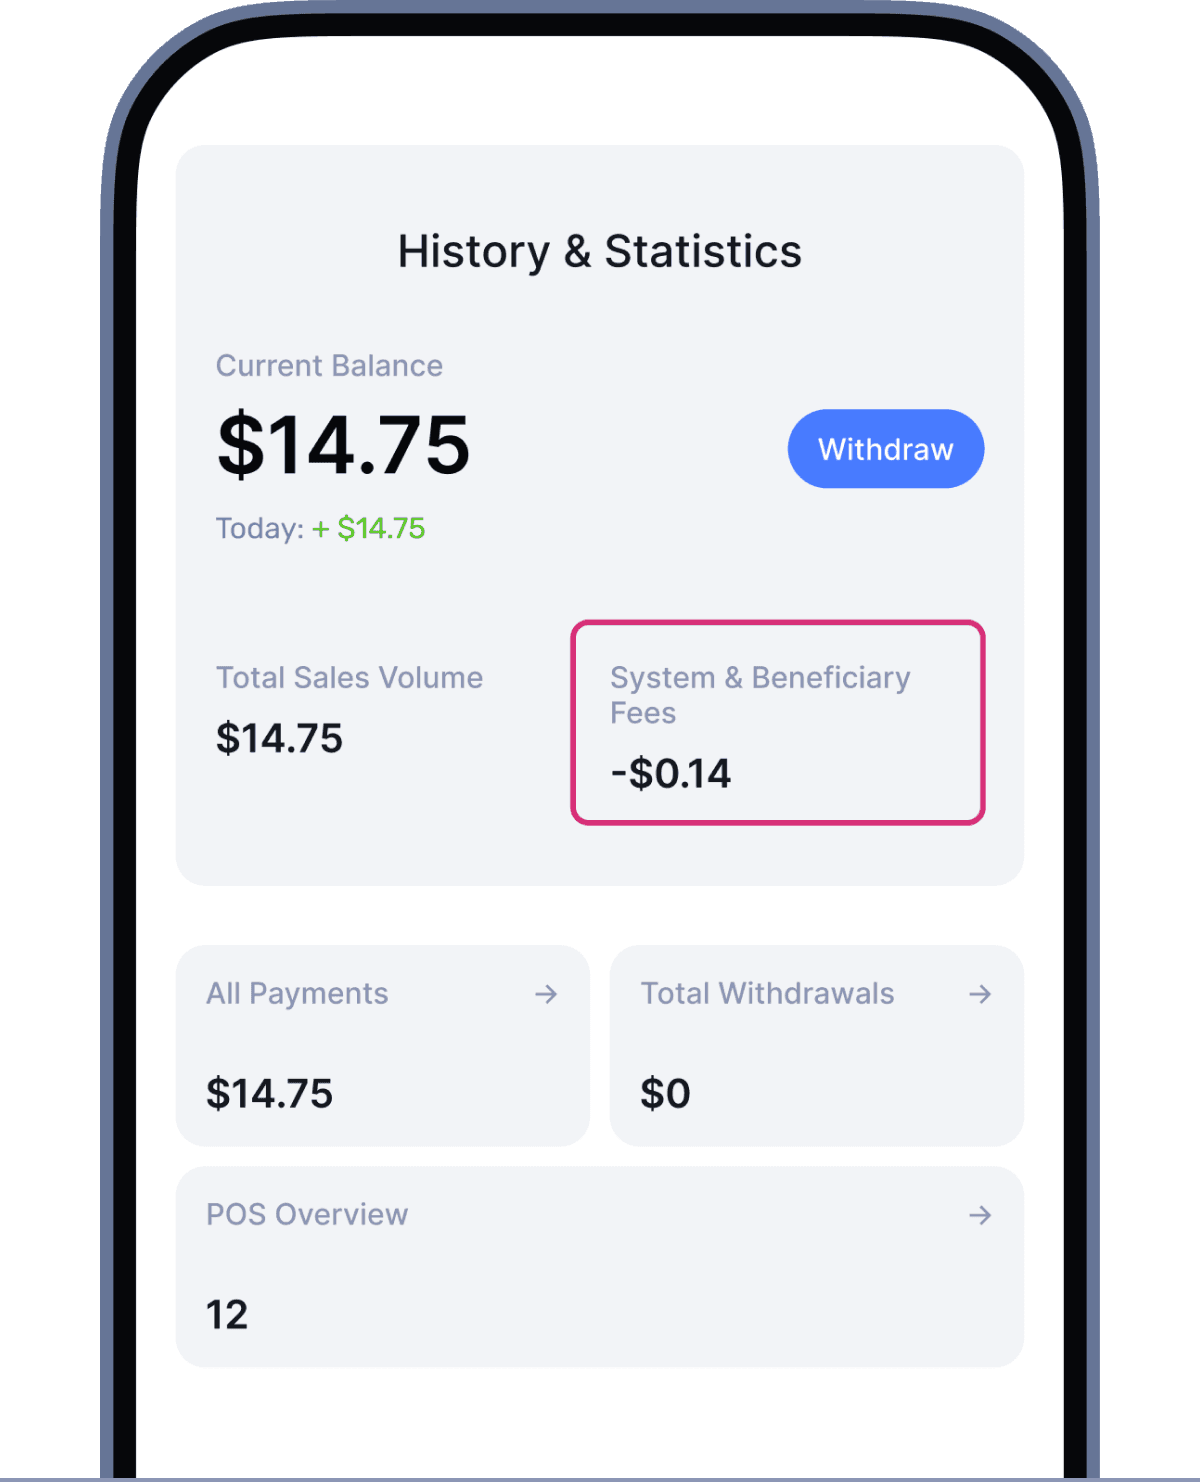
To review payments and performance, go to “History & Statistics”.
Here you can:
- Pick the desired section to view its details: All Payments and Total Withdrawals.
- Filter results by cashier, location, or date.
- View details such as: Total Earnings, Daily Income and Withdrawals.
Withdrawing Funds
 Open the “Balance” and choose from the available currencies.
 Select “Withdraw”.
 Choose either your SoftNote account or another SoftNote account to send the funds.
Withdrawing Funds to Your SoftNote Account
Send funds to the wallet connected to your account.
 Enter the amount you want to withdraw. The Address field will automatically display your SoftNote Wallet address and Tectum ID. Click the “Withdraw” button.
 The funds have been successfully transferred to your wallet.
Withdrawing Funds to to Another SoftNote Account
Withdraw funds to another SoftNote account. Future updates will also enable transfers to external platforms.
 Enter the amount you want to withdraw. The Address field will automatically display your SoftNote Wallet address and Tectum ID. Click the “Withdraw” button.The funds have been successfully transferred to the desired wallet.
Off-ramp
ePoS App
To do this, in Merchant mode on the main screen, select the desired currency and tap “Withdraw”.Enter the amount you want to withdraw — the funds will be sent to your SoftNote Wallet address linked to your merchant account.SoftNote Wallet
 After the funds are sent to your SoftNote Wallet balance, you need to migrate them from the T12 network to another network.
 To do this, go to “My Crypto”, select the currency, and tap “Migrate”.
 After the migration is complete, use the Bank Transfers/Swaps function, which is also available in the “My Crypto” section (only Android app or Web).
 Next, you can withdraw your funds through one of our partners, KYC verification is required to complete the transaction.
Future Updates
More cryptocurrencies
Support for additional tokens, giving you more flexibility in payments.

Global Integration
Pay directly from third-party wallets or crypto exchanges for a seamless experience.
FAQ
Everything you need to know about the product.
We know switching to a new payment system can raise questions. Here's everything you need to know about using SoftNote ePoS for your business — from setup to transactions and beyond.
Download ePoS Guide (.pdf)